 |
Matronics Email Lists
Web Forum Interface to the Matronics Email Lists
|
| View previous topic :: View next topic |
| Author |
Message |
carlossa52(at)gmail.com
Guest
|
 Posted: Wed Oct 02, 2013 4:14 pm Post subject: a tip Posted: Wed Oct 02, 2013 4:14 pm Post subject: a tip |
 |
|
I have noticed - through other builders comments, but also through my own experience - that using clecoes to keep parts together sometimes does not quite work.
The parts do remain attached, not doubt, but they can be slightly shifted from the original position when they were drilled.
Here's why, in case you don't know:
The rivet whole is slightly larger than the rivet, and a cleco, having an irregular shape, has plenty of room to move in a rivet hole.
For instance an A5 Avex rivet has a diameter between 0.140" and 0.155" (the rivet has "fins", therefore the diameter varies).
A solid rivet diameter is 0.155"
The corresponding drill bit is 0.160".
A black cleco is 0.149" at its widest point - but it is not round.
(Note: these are measurements I took from Items I have. You may find slightly different measurements.)
In longer parts (more than a foot or two) or assemblies of more than two parts, I find that if parts are not perfectly aligned, it's hard to insert the rivets. And, worse, parts will be warped or difficult to match as I proceed with construction.
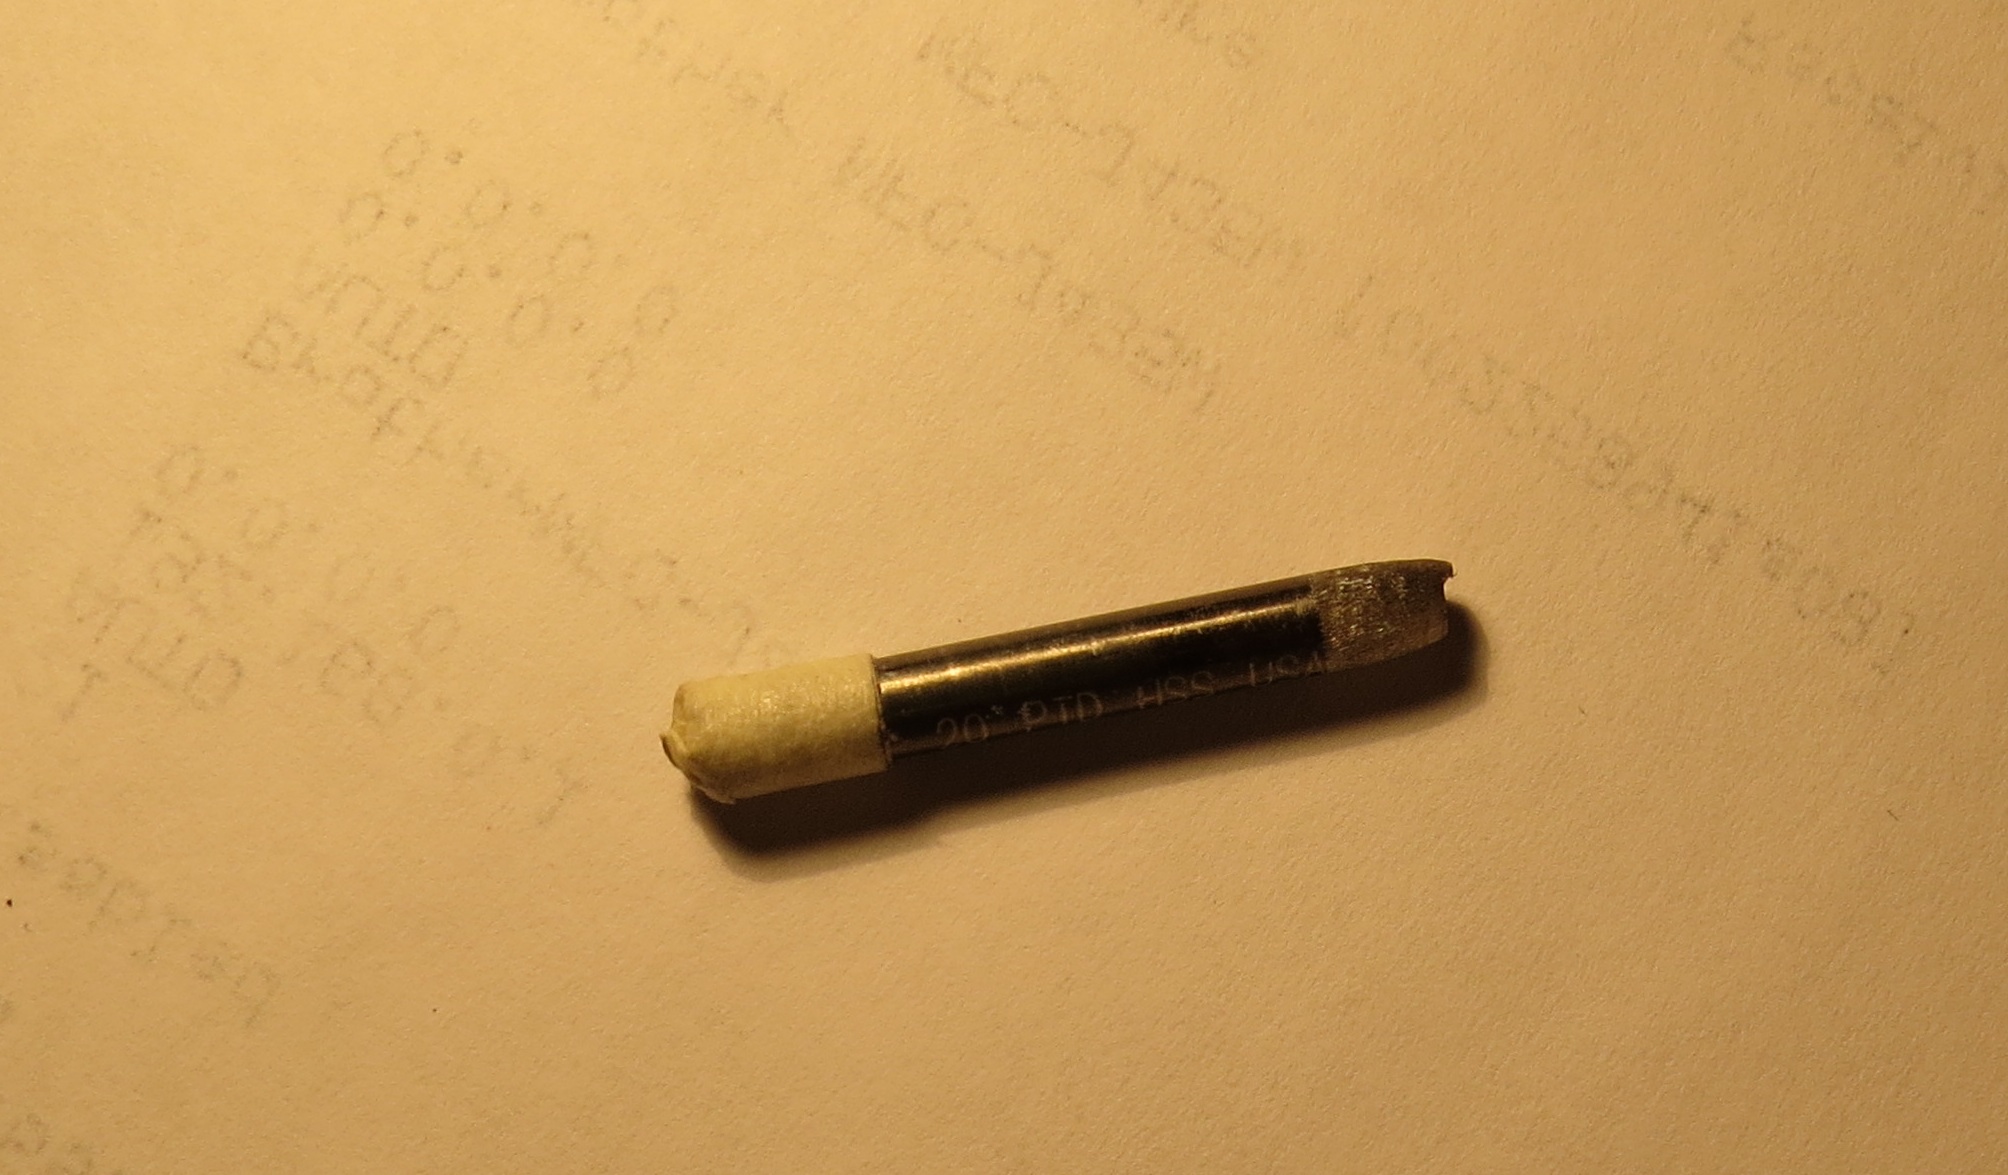
So, instead of simply trusting the clecoes, I started adding spent drill bits here and there (a solid rivet is better than a cleco, but not as good as a spent drill bit).
I eventually started cutting drill bits and grinding one end to make it easier to insert them.
(The grinding process consists of putting the drill bit in a drill or drill press and grinding it with a dremel tool.).
The opposite end is covered with masking tape - see attached photo.
I have a bunch of these, A4 and A5, and use them frequently.
Hopefully this can be useful to someone.
Blue skies
Carlos
CH601-HD, plans
(CH650 firewall and canopy)
http://www.zenith.aero/profile/CarlosSa
| | - The Matronics Zenith-List Email Forum - | | | Use the List Feature Navigator to browse the many List utilities available such as the Email Subscriptions page, Archive Search & Download, 7-Day Browse, Chat, FAQ, Photoshare, and much more:
http://www.matronics.com/Navigator?Zenith-List |
|
| Description: |
|
| Filesize: |
463.43 KB |
| Viewed: |
6289 Time(s) |
|
|
|
| Back to top |
|
 |
psm(at)att.net
Guest
|
| Posted: Wed Oct 02, 2013 4:32 pm Post subject: a tip |
|
|
Carlos,
I accept your numbers, but I think you are worrying a little bit too
much about perfection.
Clecos do line up holes pretty well because the back side of the "head"
is indeed round. This grabs the entire hole on the opposite side of the
main clamp body. Well . . . it misses the area where the crack appears
between the fingers, but it does a good job of clamping the sheet metal
in place.
The more Clecos you use, the more aligned the pieces will be. I like
starting a rivet line with Clecos in every other hole and continue
working on this line by swapping the Cleco points and empty holes as the
parts are repeatedly drilled to higher and higher sizes. I usually have
not had any problem getting the holes aligned for final riveting after
deburring. In those cases where I have difficulty inserting the rivet,
I just run the final dril through the hole again. This may mean the
holes in all the riveted pieces are not precisely the same size but I
don't think this matters. The primary gripping is done by the two heads
of the final rivet.
It is important to do a good job on your construction, but keep in mind
you are building a relatively low performance airplane rather than a
space shuttle.
Good luck,
Paul
Camas, WA
Zodiac XL, in phase II
On 10/2/2013 5:13 PM, Carlos Sa wrote:
| Quote: | I have noticed - through other builders comments, but also through my
own experience - that using clecoes to keep parts together sometimes
does not quite work.
The parts do remain attached, not doubt, but they can be slightly
shifted from the original position when they were drilled.
Here's why, in case you don't know:
The rivet whole is slightly larger than the rivet, and a cleco, having
an irregular shape, has plenty of room to move in a rivet hole.
For instance an A5 Avex rivet has a diameter between 0.140" and 0.155"
(the rivet has "fins", therefore the diameter varies).
A solid rivet diameter is 0.155"
The corresponding drill bit is 0.160".
A black cleco is 0.149" at its widest point - but it is not round.
(Note: these are measurements I took from Items I have. You may find
slightly different measurements.)
In longer parts (more than a foot or two) or assemblies of more than
two parts, I find that if parts are not perfectly aligned, it's hard
to insert the rivets. And, worse, parts will be warped or difficult to
match as I proceed with construction.
So, instead of simply trusting the clecoes, I started adding spent
drill bits here and there (a solid rivet is better than a cleco, but
not as good as a spent drill bit).
I eventually started cutting drill bits and grinding one end to make
it easier to insert them.
(The grinding process consists of putting the drill bit in a drill or
drill press and grinding it with a dremel tool.).
The opposite end is covered with masking tape - see attached photo.
I have a bunch of these, A4 and A5, and use them frequently.
Hopefully this can be useful to someone.
Blue skies
Carlos
CH601-HD, plans
(CH650 firewall and canopy)
http://www.zenith.aero/profile/CarlosSa
|
| | - The Matronics Zenith-List Email Forum - | | | Use the List Feature Navigator to browse the many List utilities available such as the Email Subscriptions page, Archive Search & Download, 7-Day Browse, Chat, FAQ, Photoshare, and much more:
http://www.matronics.com/Navigator?Zenith-List |
|
|
|
| Back to top |
|
|
afterfxllc(at)aol.com
Guest
|
| Posted: Wed Oct 02, 2013 6:25 pm Post subject: a tip |
|
|
Carlos you have way to much time on your hands... don't over think it it's just an airplane not the space shuttle.


  --
| | - The Matronics Zenith-List Email Forum - | | | Use the List Feature Navigator to browse the many List utilities available such as the Email Subscriptions page, Archive Search & Download, 7-Day Browse, Chat, FAQ, Photoshare, and much more:
http://www.matronics.com/Navigator?Zenith-List |
|
|
|
| Back to top |
|
|
afterfxllc(at)aol.com
Guest
|
| Posted: Wed Oct 02, 2013 6:26 pm Post subject: a tip |
|
|
OMG I wrote the same thing and then read your message now that's funny right there I don't care who you are........


  --
| | - The Matronics Zenith-List Email Forum - | | | Use the List Feature Navigator to browse the many List utilities available such as the Email Subscriptions page, Archive Search & Download, 7-Day Browse, Chat, FAQ, Photoshare, and much more:
http://www.matronics.com/Navigator?Zenith-List |
|
|
|
| Back to top |
|
|
BARRY CHECK 6
Joined: 15 Mar 2011
Posts: 738
|
| Posted: Wed Oct 02, 2013 9:14 pm Post subject: a tip |
|
|
Carlos:

 Good write up.  But there is a trick!

On long parts and especially parts that have a curve to them...

 Start in the CENTER and alternately work your way to the ends.

This goes for BOTH inserting the CLECOE'S.

 The removal as you insert the rivets and...

The insertion and setting of the rivets.

 AND!  You know those CLECOE CLAMPS?

There are great for clamping the ends of the mating parts.

 Both when drilling and inserting CLECOE'S.

Barry


On Wed, Oct 2, 2013 at 8:13 PM, Carlos Sa <carlossa52(at)gmail.com (carlossa52(at)gmail.com)> wrote:

[quote] I have noticed - through other builders comments, but also through my own experience - that using clecoes to keep parts together sometimes does not quite work.


The parts do remain attached, not doubt, but they can be slightly shifted from the original position when they were drilled.

Here's why, in case you don't know:


The rivet whole is slightly larger than the rivet, and a cleco, having an irregular shape, has plenty of room to move in a rivet hole.


For instance an A5 Avex rivet has a diameter between 0.140" and 0.155" (the rivet has "fins", therefore the diameter varies).


A solid rivet diameter is 0.155"


The corresponding drill bit is 0.160".


A black cleco is 0.149" at its widest point - but it is not round.


(Note: these are measurements I took from Items I have. You may find slightly different measurements.)


In longer parts (more than a foot or two) or assemblies of more than two parts, I find that if parts are not perfectly aligned, it's hard to insert the rivets. And, worse, parts will be warped or difficult to match as I proceed with construction.


So, instead of simply trusting the clecoes, I started adding spent drill bits here and there (a solid rivet is better than a cleco, but not as good as a spent drill bit).

I eventually started cutting drill bits and grinding one end to make it easier to insert them.


(The grinding process consists of putting the drill bit in a drill or drill press and grinding it with a dremel tool.).


The opposite end is covered with masking tape - see attached photo.

I have a bunch of these, A4 and A5, and use them frequently.


Hopefully this can be useful to someone.

Blue skies


Carlos

CH601-HD, plans


(CH650 firewall and canopy)

http://www.zenith.aero/profile/CarlosSa


 [b]
| | - The Matronics Zenith-List Email Forum - | | | Use the List Feature Navigator to browse the many List utilities available such as the Email Subscriptions page, Archive Search & Download, 7-Day Browse, Chat, FAQ, Photoshare, and much more:
http://www.matronics.com/Navigator?Zenith-List |
|
|
|
| Back to top |
|
|
paulrod36(at)msn.com
Guest
|
| Posted: Thu Oct 03, 2013 5:58 pm Post subject: a tip |
|
|
<?xml:namespace prefix="v" /><?xml:namespace prefix="o" /><![endif]-->  Agreed. Aside from the philosophical "thingy" (that's Socratic talk) of  making the perfect the enemy of the good, we can quote Chris, who said, "You're  making a tractor, not an F-16". I've found the design to be very forgiving of  human error...


 Paul R

 [quote]   ---
| | - The Matronics Zenith-List Email Forum - | | | Use the List Feature Navigator to browse the many List utilities available such as the Email Subscriptions page, Archive Search & Download, 7-Day Browse, Chat, FAQ, Photoshare, and much more:
http://www.matronics.com/Navigator?Zenith-List |
|
|
|
| Back to top |
|
|
carlossa52(at)gmail.com
Guest
|
| Posted: Fri Oct 04, 2013 2:10 pm Post subject: a tip |
|
|
Thanks all for the comments
Having been around the Matronics lists for more than a few years, I'm fully aware that I am not building a space shuttle.
So much so that I have returned the silica bricks (except a few that I kept to repair the fireplace) and cancelled the solid fuel boosters order.
Seriously: what I described is quite simple and does not add to the workload.
On the contrary, I strongly believe that it saves time by avoiding glitches and associated head-scratching. I have used this process in the wings and tail feathers (all done) and fuse (past "boat stage").
Happy building
Carlos
[quote]
On Wed, Oct 2, 2013 at 8:13 PM, Carlos Sa <carlossa52(at)gmail.com (carlossa52(at)gmail.com)> wrote:
| Quote: | I have noticed - through other builders comments, but also through my own experience - that using clecoes to keep parts together sometimes does not quite work.
The parts do remain attached, not doubt, but they can be slightly shifted from the original position when they were drilled.
Here's why, in case you don't know:
The rivet whole is slightly larger than the rivet, and a cleco, having an irregular shape, has plenty of room to move in a rivet hole.
For instance an A5 Avex rivet has a diameter between 0.140" and 0.155" (the rivet has "fins", therefore the diameter varies).
A solid rivet diameter is 0.155"
The corresponding drill bit is 0.160".
A black cleco is 0.149" at its widest point - but it is not round.
(Note: these are measurements I took from Items I have. You may find slightly different measurements.)
In longer parts (more than a foot or two) or assemblies of more than two parts, I find that if parts are not perfectly aligned, it's hard to insert the rivets. And, worse, parts will be warped or difficult to match as I proceed with construction.
So, instead of simply trusting the clecoes, I started adding spent drill bits here and there (a solid rivet is better than a cleco, but not as good as a spent drill bit).
I eventually started cutting drill bits and grinding one end to make it easier to insert them.
(The grinding process consists of putting the drill bit in a drill or drill press and grinding it with a dremel tool.).
The opposite end is covered with masking tape - see attached photo.
I have a bunch of these, A4 and A5, and use them frequently.
Hopefully this can be useful to someone.
Blue skies
Carlos
CH601-HD, plans
(CH650 firewall and canopy)
http://www.zenith.aero/profile/CarlosSa
|
[b]
| | - The Matronics Zenith-List Email Forum - | | | Use the List Feature Navigator to browse the many List utilities available such as the Email Subscriptions page, Archive Search & Download, 7-Day Browse, Chat, FAQ, Photoshare, and much more:
http://www.matronics.com/Navigator?Zenith-List |
|
|
|
| Back to top |
|
|
entecrj(at)sbcglobal.net
Guest
|
| Posted: Fri Oct 04, 2013 6:39 pm Post subject: a tip |
|
|
Carlos:
Donât let anyone discourage you from trying to achieve perfection when building anything.
When you are finished you donât have to explain any misfits, wrinkles or misalignments.
Russell Johnson
601-HDS (with misfits, wrinkles & misalignments)
From: Carlos Sa (carlossa52(at)gmail.com)
Sent: Friday, October 04, 2013 5:09 PM
To: zenith-list(at)matronics.com (zenith-list(at)matronics.com)
Subject: Re: a tip
Thanks all for the comments
Having been around the Matronics lists for more than a few years, I'm fully aware that I am not building a space shuttle.
So much so that I have returned the silica bricks (except a few that I kept to repair the fireplace) and cancelled the solid fuel boosters order.
Seriously: what I described is quite simple and does not add to the workload.
On the contrary, I strongly believe that it saves time by avoiding glitches and associated head-scratching. I have used this process in the wings and tail feathers (all done) and fuse (past "boat stage").
Happy building
Carlos
[quote]
On Wed, Oct 2, 2013 at 8:13 PM, Carlos Sa <carlossa52(at)gmail.com (carlossa52(at)gmail.com)> wrote:
| Quote: | I have noticed - through other builders comments, but also through my own experience - that using clecoes to keep parts together sometimes does not quite work.
The parts do remain attached, not doubt, but they can be slightly shifted from the original position when they were drilled.
Here's why, in case you don't know:
The rivet whole is slightly larger than the rivet, and a cleco, having an irregular shape, has plenty of room to move in a rivet hole.
For instance an A5 Avex rivet has a diameter between 0.140" and 0.155" (the rivet has "fins", therefore the diameter varies).
A solid rivet diameter is 0.155"
The corresponding drill bit is 0.160".
A black cleco is 0.149" at its widest point - but it is not round.
(Note: these are measurements I took from Items I have. You may find slightly different measurements.)
In longer parts (more than a foot or two) or assemblies of more than two parts, I find that if parts are not perfectly aligned, it's hard to insert the rivets. And, worse, parts will be warped or difficult to match as I proceed with construction.
So, instead of simply trusting the clecoes, I started adding spent drill bits here and there (a solid rivet is better than a cleco, but not as good as a spent drill bit).
I eventually started cutting drill bits and grinding one end to make it easier to insert them.
(The grinding process consists of putting the drill bit in a drill or drill press and grinding it with a dremel tool.).
The opposite end is covered with masking tape - see attached photo.
I have a bunch of these, A4 and A5, and use them frequently.
Hopefully this can be useful to someone.
Blue skies
Carlos
CH601-HD, plans
(CH650 firewall and canopy)
http://www.zenith.aero/profile/CarlosSa
|
href="http://www.matronics.com/Navigator?Zenith-List">http://www.matronhref="http://forums.matronics.com">http://forums.matronics.com
href="http://www.matronics.com/contribution">http://www.matronics.com/c
[b]
| | - The Matronics Zenith-List Email Forum - | | | Use the List Feature Navigator to browse the many List utilities available such as the Email Subscriptions page, Archive Search & Download, 7-Day Browse, Chat, FAQ, Photoshare, and much more:
http://www.matronics.com/Navigator?Zenith-List |
|
|
|
| Back to top |
|
|
paulrod36(at)msn.com
Guest
|
| Posted: Sat Oct 05, 2013 9:26 am Post subject: a tip |
|
|
<?xml:namespace prefix="v" /><?xml:namespace prefix="o" /><![endif]-->  Boosters, huh?  hhhmmmm....40 inches between gear leg attachments,  pretty close to the CG, AN3 bolts,......Hey Carlos, you still got those  boosters?

 [quote]   ---
| | - The Matronics Zenith-List Email Forum - | | | Use the List Feature Navigator to browse the many List utilities available such as the Email Subscriptions page, Archive Search & Download, 7-Day Browse, Chat, FAQ, Photoshare, and much more:
http://www.matronics.com/Navigator?Zenith-List |
|
|
|
| Back to top |
|
|
|
|
You cannot post new topics in this forum
You cannot reply to topics in this forum
You cannot edit your posts in this forum
You cannot delete your posts in this forum
You cannot vote in polls in this forum
You cannot attach files in this forum
You can download files in this forum
|
Powered by phpBB © 2001, 2005 phpBB Group
|

