 |
Matronics Email Lists
Web Forum Interface to the Matronics Email Lists
|
| View previous topic :: View next topic |
| Author |
Message |
TxDave
Joined: 22 Jul 2006
Posts: 168
Location: Temple, TX
|
 Posted: Mon Mar 26, 2007 9:10 am Post subject: Scratch built wing update and pictures Posted: Mon Mar 26, 2007 9:10 am Post subject: Scratch built wing update and pictures |
 |
|
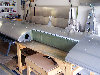
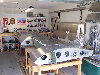
I am nearly finished with my first wing. It has taken longer than I expected to reach this point. However, a lot of that time was spent correcting my dumb mistakes. I figure the second wing will take half the time to complete. These pictures help illustrate my 3 piece LE skin concept.


Dave Clay

Temple, TX

601XL from plans

http://www.daves601xl.com
| | - The Matronics Zenith-List Email Forum - | | | Use the List Feature Navigator to browse the many List utilities available such as the Email Subscriptions page, Archive Search & Download, 7-Day Browse, Chat, FAQ, Photoshare, and much more:
http://www.matronics.com/Navigator?Zenith-List |
|
| Description: |
|
| Filesize: |
155.06 KB |
| Viewed: |
687 Time(s) |
|
| Description: |
|
| Filesize: |
268.6 KB |
| Viewed: |
675 Time(s) |
|
|
|
| Back to top |
|
 |
Gig Giacona
Joined: 10 Jan 2006
Posts: 1416
Location: El Dorado Arkansas USA
|
| Posted: Mon Mar 26, 2007 12:21 pm Post subject: Re: Scratch built wing update and pictures |
|
|
I do like your 3 peice leading edge. If I had it to do over again I'd do the same. I'd also consider what it would take to make that a wet wing, fuel tank.
| | - The Matronics Zenith-List Email Forum - | | | Use the List Feature Navigator to browse the many List utilities available such as the Email Subscriptions page, Archive Search & Download, 7-Day Browse, Chat, FAQ, Photoshare, and much more:
http://www.matronics.com/Navigator?Zenith-List |
|
_________________
W.R. "Gig" Giacona
601XL Under Construction
See my progress at www.peoamerica.net/N601WR |
|
| Back to top |
|
|
ashontz

Joined: 27 Dec 2006
Posts: 723
|
| Posted: Tue Mar 27, 2007 5:37 am Post subject: Re: Scratch built wing update and pictures |
|
|
Looks good. I'm about ready to skin my first wing myself.
Regarding the 3 piece nose skin design, did you research any existing production planes for this? I like the idea, would make maintenance much easier, I just wonder how much it affects the overall strength of the wing if at all.
How long did it take you to put the skins on? Just curious, because I'm up to that point myself.
do not archive
| TxDave wrote: | I am nearly finished with my first wing. It has taken longer than I expected to reach this point. However, a lot of that time was spent correcting my dumb mistakes. I figure the second wing will take half the time to complete. These pictures help illustrate my 3 piece LE skin concept.
Dave Clay
Temple, TX
601XL from plans
http://www.daves601xl.com |
| | - The Matronics Zenith-List Email Forum - | | | Use the List Feature Navigator to browse the many List utilities available such as the Email Subscriptions page, Archive Search & Download, 7-Day Browse, Chat, FAQ, Photoshare, and much more:
http://www.matronics.com/Navigator?Zenith-List |
|
|
|
| Back to top |
|
|
TxDave
Joined: 22 Jul 2006
Posts: 168
Location: Temple, TX
|
| Posted: Tue Mar 27, 2007 8:31 am Post subject: Re: Scratch built wing update and pictures |
|
|
Hey Andrew,

I don't know about production aircraft, but I know there are other homebuilts built with multiple leading edge sections. RV's and Bearhawk for example. I got approval from ZAC before doing this. Also the new ZAC Construction Standards manual says it is OK to use multiple skins as long as they overlap a rib. I'm not one of those builders who keeps a log of every hour spent working on my airplane, so I can't say exactly how long it took. I can say for sure that it was much quicker and easier to make a 3 piece LE skin than to make the single 12' piece. It works for me, so I'm happy with it.


Dave Clay

http://www.daves601xl.com
| | - The Matronics Zenith-List Email Forum - | | | Use the List Feature Navigator to browse the many List utilities available such as the Email Subscriptions page, Archive Search & Download, 7-Day Browse, Chat, FAQ, Photoshare, and much more:
http://www.matronics.com/Navigator?Zenith-List |
|
|
|
| Back to top |
|
|
ashontz
Joined: 27 Dec 2006
Posts: 723
|
| Posted: Tue Mar 27, 2007 8:46 am Post subject: Re: Scratch built wing update and pictures |
|
|
Dave,
when you say 'overlap" does that mean that the final skin tha goes on to cover the fuel tank will cover more than just the hole that we can see (ie. it will cover the tank plus, or just the ribs on either side of the tank)? If so, you must have double ribs on either side of the tankto rivet into. If not it'll be interesting to see how flush you can butt the skins.
One other thing, are you going with the 15 gallon tanks? I took a time out and went back a reconfigured for the 15 gallon tanks. I thought about the 4 12 gallon tanks, but that seemed like overkill and fuel management issues. Two 15 gallon tanks sounds good to me?
Andy
Do not archive
| TxDave wrote: | Hey Andrew,
I don't know about production aircraft, but I know there are other homebuilts built with multiple leading edge sections. RV's and Bearhawk for example. I got approval from ZAC before doing this. Also the new ZAC Construction Standards manual says it is OK to use multiple skins as long as they overlap a rib. I'm not one of those builders who keeps a log of every hour spent working on my airplane, so I can't say exactly how long it took. I can say for sure that it was much quicker and easier to make a 3 piece LE skin than to make the single 12' piece. It works for me, so I'm happy with it.
Dave Clay
http://www.daves601xl.com |
| | - The Matronics Zenith-List Email Forum - | | | Use the List Feature Navigator to browse the many List utilities available such as the Email Subscriptions page, Archive Search & Download, 7-Day Browse, Chat, FAQ, Photoshare, and much more:
http://www.matronics.com/Navigator?Zenith-List |
|
|
|
| Back to top |
|
|
TxDave
Joined: 22 Jul 2006
Posts: 168
Location: Temple, TX
|
| Posted: Tue Mar 27, 2007 9:21 pm Post subject: Re: Scratch built wing update and pictures |
|
|
The section covering the fuel tank will overlap the others at the flanges of nose ribs 3 and 4. Butting the skins together is not mentioned in the ZAC Construction Standards and was never considered. I'm going with the standard tanks. My sweet wife can't go too long without a pit stop on road trips in the car, so....


do not archive


Dave Clay
| | - The Matronics Zenith-List Email Forum - | | | Use the List Feature Navigator to browse the many List utilities available such as the Email Subscriptions page, Archive Search & Download, 7-Day Browse, Chat, FAQ, Photoshare, and much more:
http://www.matronics.com/Navigator?Zenith-List |
|
|
|
| Back to top |
|
|
jcbets76(at)yahoo.com
Guest
|
| Posted: Wed Mar 28, 2007 3:47 am Post subject: Scratch built wing update and pictures |
|
|
[quote][b]
| | - The Matronics Zenith-List Email Forum - | | | Use the List Feature Navigator to browse the many List utilities available such as the Email Subscriptions page, Archive Search & Download, 7-Day Browse, Chat, FAQ, Photoshare, and much more:
http://www.matronics.com/Navigator?Zenith-List |
|
|
|
| Back to top |
|
|
jcbets76(at)yahoo.com
Guest
|
| Posted: Wed Mar 28, 2007 3:50 am Post subject: Scratch built wing update and pictures |
|
|
wrong email replied on.  Pls ignore my last email.  It was only meant for Dave.  He's been helping me on some of my beginner questions.  Sorry folks.


TxDave <dclaytx2(at)hotmail.com> wrote:[quote] --> Zenith-List message posted by: "TxDave"


The section covering the fuel tank will overlap the others at the flanges of nose ribs 3 and 4. Butting the skins together is not mentioned in the ZAC Construction Standards and was never considered. I'm going with the standard tanks. My sweet wife can't go too long without a pit stop on road trips in the car, so....


do not archive


Dave Clay


Read this topic online [quote][b]
| | - The Matronics Zenith-List Email Forum - | | | Use the List Feature Navigator to browse the many List utilities available such as the Email Subscriptions page, Archive Search & Download, 7-Day Browse, Chat, FAQ, Photoshare, and much more:
http://www.matronics.com/Navigator?Zenith-List |
|
|
|
| Back to top |
|
|
ashontz
Joined: 27 Dec 2006
Posts: 723
|
| Posted: Wed Mar 28, 2007 3:52 am Post subject: Re: Scratch built wing update and pictures |
|
|
At least she'll fly with you. 
So the inboard skin ends at rib 4, the outboard skin starts at rib 5, then the center skin overlaps both and starts at rib 3 and extends to rib 6? Sounds good. I may go with that too. You said ZAC approved that, right? That's not a bad way to go in case you have to get in there and fart with the tank. The only problem I see with that is the back side of the rivets if you have to drill them out. I guess you still have decent access through the lightening holes. I'd imagine that ZAC would aprrove of this for the 15 gallon tanks too?
So you're longest nose skin is roughly 6 feet, if that long. Should be about as hard to restle with as the stabilizer skin, and that was a piece of cake.
do not archive
| TxDave wrote: | The section covering the fuel tank will overlap the others at the flanges of nose ribs 3 and 4. Butting the skins together is not mentioned in the ZAC Construction Standards and was never considered. I'm going with the standard tanks. My sweet wife can't go too long without a pit stop on road trips in the car, so....
do not archive
Dave Clay |
| | - The Matronics Zenith-List Email Forum - | | | Use the List Feature Navigator to browse the many List utilities available such as the Email Subscriptions page, Archive Search & Download, 7-Day Browse, Chat, FAQ, Photoshare, and much more:
http://www.matronics.com/Navigator?Zenith-List |
|
|
|
| Back to top |
|
|
planecrazydld(at)yahoo.co
Guest
|
| Posted: Wed Mar 28, 2007 4:36 am Post subject: Scratch built wing update and pictures |
|
|
Not having my drawings with me onthe road, this observation may be silly...


  Why can't the rib flanges simply be oriented towards the tank bay? That way if you do have to remove the tank-covering skin, no FOD will result that is not readily removed while the causative work is being done in the bay...


  I like the 3 piece leading edge concept as well as anything I have heard since I started monitoring the list. I also was wondering what, speciifically, ZAC approved and did they put it in writing? Were the proposed changes simply discussed verbally or were there any sketches submitted?


  If no documentation was submitted I will draw up the change and forward the CAD file to ZAC for "official" approval or correction. I was even wondering if the tank-covering skin could be attached with nutplates and screws or if the tank itself could be like the Cherokee's and be the leading edge proper...


ashontz <ashontz(at)nbme.org> wrote:

  [quote]--> Zenith-List message posted by: "ashontz"


At least she'll fly with you.


So the inboard skin ends at rib 4, the outboard skin starts at rib 5, then the center skin overlaps both and starts at rib 3 and extends to rib 6? Sounds good. I may go with that too. You said ZAC approved that, right? That's not a bad way to go in case you have to get in there and fart with the tank. The only problem I see with that is the back side of the rivets if you have to drill them out. I guess you still have decent access through the lightening holes. I'd imagine that ZAC would aprrove of this for the 15 gallon tanks too?


So you're longest nose skin is roughly 6 feet, if that long. Should be about as hard to restle with as the stabilizer skin, and that was a piece of  Don't pick lemons.

 See all the new 2007 cars at Yahoo! Autos. [quote][b]
| | - The Matronics Zenith-List Email Forum - | | | Use the List Feature Navigator to browse the many List utilities available such as the Email Subscriptions page, Archive Search & Download, 7-Day Browse, Chat, FAQ, Photoshare, and much more:
http://www.matronics.com/Navigator?Zenith-List |
|
|
|
| Back to top |
|
|
p.mulwitz(at)worldnet.att
Guest
|
| Posted: Wed Mar 28, 2007 5:05 am Post subject: Scratch built wing update and pictures |
|
|
Hi David,
I think the flanges are oriented away from the tank to allow the tank
to fit into the area. If the flanges were faced toward the tank you
might need to move the nose ribs apart so you can move the tank into position.
Paul
XL fuselage
do not archive
At 04:35 AM 3/28/2007, you wrote:
| Quote: |
Why can't the rib flanges simply be oriented towards the tank bay?
That way if you do have to remove the tank-covering skin, no FOD
will result that is not readily removed while the causative work is
being done in the bay...
|
---------------------------------------------
Paul Mulwitz
32013 NE Dial Road
Camas, WA 98607
---------------------------------------------
| | - The Matronics Zenith-List Email Forum - | | | Use the List Feature Navigator to browse the many List utilities available such as the Email Subscriptions page, Archive Search & Download, 7-Day Browse, Chat, FAQ, Photoshare, and much more:
http://www.matronics.com/Navigator?Zenith-List |
|
|
|
| Back to top |
|
|
ashontz
Joined: 27 Dec 2006
Posts: 723
|
| Posted: Wed Mar 28, 2007 5:38 am Post subject: Re: Scratch built wing update and pictures |
|
|
I'm going to do mine this way. I know #3 and #4 ribs are close together. #5 and #6 may be close together too. If not I'll add another rib on the outboard side of the tank for more to tie into.
| | - The Matronics Zenith-List Email Forum - | | | Use the List Feature Navigator to browse the many List utilities available such as the Email Subscriptions page, Archive Search & Download, 7-Day Browse, Chat, FAQ, Photoshare, and much more:
http://www.matronics.com/Navigator?Zenith-List |
|
|
|
| Back to top |
|
|
TxDave
Joined: 22 Jul 2006
Posts: 168
Location: Temple, TX
|
| Posted: Wed Mar 28, 2007 7:36 am Post subject: Re: Scratch built wing update and pictures |
|
|
Hold on there kids! I think we're getting confused. The inboard section covers nose ribs 1-3. There are only 3 nose ribs inboard of the fuel tank in my plans. The outboard section covers nose ribs 4-wingtip. The fuel tank section overlaps the other skins only about 20mm at each end, over the flanges at nose ribs 3 and 4. There is no need to add any additional nose ribs.


In the new ZAC Construction Standards Manual on page 40 (CS #604) the method for using several smaller skins is clearly described. This is where I got the idea. I called and spoke to Caleb at ZAC and described what I planned to do and he said it would be fine if I followed the method in the Construction Standards. It's really very simple.


I suppose nut plates and screws would work , but the Standards recommend you stick with the fasteners specified in the plans.


Dave Clay
| | - The Matronics Zenith-List Email Forum - | | | Use the List Feature Navigator to browse the many List utilities available such as the Email Subscriptions page, Archive Search & Download, 7-Day Browse, Chat, FAQ, Photoshare, and much more:
http://www.matronics.com/Navigator?Zenith-List |
|
|
|
| Back to top |
|
|
ashontz
Joined: 27 Dec 2006
Posts: 723
|
| Posted: Wed Mar 28, 2007 8:00 am Post subject: Re: Scratch built wing update and pictures |
|
|
Sorry, you're right, I was thinking of the rear ribs, of which there are four before you reach the gas tank area, not that the rear ribs effect the fuel tank.
do not archive
| TxDave wrote: | Hold on there kids! I think we're getting confused. The inboard section covers nose ribs 1-3. There are only 3 nose ribs inboard of the fuel tank in my plans. The outboard section covers nose ribs 4-wingtip. The fuel tank section overlaps the other skins only about 20mm at each end, over the flanges at nose ribs 3 and 4. There is no need to add any additional nose ribs.
In the new ZAC Construction Standards Manual on page 40 (CS #604) the method for using several smaller skins is clearly described. This is where I got the idea. I called and spoke to Caleb at ZAC and described what I planned to do and he said it would be fine if I followed the method in the Construction Standards. It's really very simple.
I suppose nut plates and screws would work , but the Standards recommend you stick with the fasteners specified in the plans.
Dave Clay |
| | - The Matronics Zenith-List Email Forum - | | | Use the List Feature Navigator to browse the many List utilities available such as the Email Subscriptions page, Archive Search & Download, 7-Day Browse, Chat, FAQ, Photoshare, and much more:
http://www.matronics.com/Navigator?Zenith-List |
|
|
|
| Back to top |
|
|
ashontz
Joined: 27 Dec 2006
Posts: 723
|
| Posted: Wed Mar 28, 2007 8:02 am Post subject: Re: Scratch built wing update and pictures |
|
|
Could you send me a copy of the related pages please. I'd like to see them.
I'm going with 15 gallon tanks, which moves rib 4 out about 200mm. Do you see any problem with the 3 skin approach considering I'm going with 15 gallon tanks?
do not archive
| TxDave wrote: | Hold on there kids! I think we're getting confused. The inboard section covers nose ribs 1-3. There are only 3 nose ribs inboard of the fuel tank in my plans. The outboard section covers nose ribs 4-wingtip. The fuel tank section overlaps the other skins only about 20mm at each end, over the flanges at nose ribs 3 and 4. There is no need to add any additional nose ribs.
In the new ZAC Construction Standards Manual on page 40 (CS #604) the method for using several smaller skins is clearly described. This is where I got the idea. I called and spoke to Caleb at ZAC and described what I planned to do and he said it would be fine if I followed the method in the Construction Standards. It's really very simple.
I suppose nut plates and screws would work , but the Standards recommend you stick with the fasteners specified in the plans.
Dave Clay |
| | - The Matronics Zenith-List Email Forum - | | | Use the List Feature Navigator to browse the many List utilities available such as the Email Subscriptions page, Archive Search & Download, 7-Day Browse, Chat, FAQ, Photoshare, and much more:
http://www.matronics.com/Navigator?Zenith-List |
|
|
|
| Back to top |
|
|
TxDave
Joined: 22 Jul 2006
Posts: 168
Location: Temple, TX
|
| Posted: Wed Mar 28, 2007 10:20 am Post subject: Re: Scratch built wing update and pictures |
|
|
Andrew,

I'll email you the pdf file for the Construction Standards. I see no reason why this wouldn't work for the long range tanks.


do not archive


Dave Clay
| | - The Matronics Zenith-List Email Forum - | | | Use the List Feature Navigator to browse the many List utilities available such as the Email Subscriptions page, Archive Search & Download, 7-Day Browse, Chat, FAQ, Photoshare, and much more:
http://www.matronics.com/Navigator?Zenith-List |
|
|
|
| Back to top |
|
|
ashontz
Joined: 27 Dec 2006
Posts: 723
|
| Posted: Wed Mar 28, 2007 10:22 am Post subject: Re: Scratch built wing update and pictures |
|
|
It should be fine, it's only an extra 200mm longer.
| TxDave wrote: | Andrew,
I'll email you the pdf file for the Construction Standards. I see no reason why this wouldn't work for the long range tanks.
do not archive
Dave Clay |
| | - The Matronics Zenith-List Email Forum - | | | Use the List Feature Navigator to browse the many List utilities available such as the Email Subscriptions page, Archive Search & Download, 7-Day Browse, Chat, FAQ, Photoshare, and much more:
http://www.matronics.com/Navigator?Zenith-List |
|
|
|
| Back to top |
|
|
planecrazydld(at)yahoo.co
Guest
|
| Posted: Wed Mar 28, 2007 3:05 pm Post subject: Scratch built wing update and pictures |
|
|
..and I had wondered about that possibility. I will look closely at the drawings (might just reverse them into CAD so that I can better visualize the relationships) and see what the consequences would be.
Paul Mulwitz <p.mulwitz(at)worldnet.att.net> wrote: [quote]--> Zenith-List message posted by: Paul Mulwitz
Hi David,
I think the flanges are oriented away from the tank to allow the tank
to fit into the area. If the flanges were faced toward the tank you
might need to move the nose ribs apart so you can move the tank into position.
Paul
XL fuselage
do not archive
At 04:35 AM 3/28/2007, you wrote:
| Quote: |
Why can't the rib flanges simply be oriented towards the tank bay?
That way if you do have to remove the tank-covering skin, no FOD
will result that is not Harleysville (SE) PA
Zodiac 601XL/Corvair?
|
[quote][b]
| | - The Matronics Zenith-List Email Forum - | | | Use the List Feature Navigator to browse the many List utilities available such as the Email Subscriptions page, Archive Search & Download, 7-Day Browse, Chat, FAQ, Photoshare, and much more:
http://www.matronics.com/Navigator?Zenith-List |
|
|
|
| Back to top |
|
|
ashontz
Joined: 27 Dec 2006
Posts: 723
|
| Posted: Thu Mar 29, 2007 4:06 am Post subject: Re: Scratch built wing update and pictures |
|
|
I believe it's meant to give the tank a nice flush end to rest against, even with the cork. Otherwise you have a tank fitting inside a flange that has exposed rivet backs. Now what do you do, make the tank small at the ends, jam it in there and let the rivet backs wear on the tank? Better to just put the flush side of the flange towards the tank.
[quote="planecrazydld(at)yahoo.co"]..and I had wondered about that possibility. I will look closely at the drawings (might just reverse them into CAD so that I can better visualize the relationships) and see what the consequences would be.
Paul Mulwitz <p> wrote: [quote]--> Zenith-List message posted by: Paul Mulwitz
Hi David,
I think the flanges are oriented away from the tank to allow the tank
to fit into the area. If the flanges were faced toward the tank you
might need to move the nose ribs apart so you can move the tank into position.
Paul
XL fuselage
do not archive
At 04:35 AM 3/28/2007, you wrote:
| Quote: |
Why can't the rib flanges simply be oriented towards the tank bay?
That way if you do have to remove the tank-covering skin, no FOD
will result that is not Harleysville (SE) PA
Zodiac 601XL/Corvair?
|
| | - The Matronics Zenith-List Email Forum - | | | Use the List Feature Navigator to browse the many List utilities available such as the Email Subscriptions page, Archive Search & Download, 7-Day Browse, Chat, FAQ, Photoshare, and much more:
http://www.matronics.com/Navigator?Zenith-List |
|
|
|
| Back to top |
|
|
|
|
You cannot post new topics in this forum
You cannot reply to topics in this forum
You cannot edit your posts in this forum
You cannot delete your posts in this forum
You cannot vote in polls in this forum
You cannot attach files in this forum
You can download files in this forum
|
Powered by phpBB © 2001, 2005 phpBB Group
|

