 |
Matronics Email Lists
Web Forum Interface to the Matronics Email Lists
|
| View previous topic :: View next topic |
| Author |
Message |
MauleDriver(at)nc.rr.com
Guest
|
 Posted: Sat Feb 20, 2010 9:05 am Post subject: Doing the windscreen - any last minutes tips? Posted: Sat Feb 20, 2010 9:05 am Post subject: Doing the windscreen - any last minutes tips? |
 |
|
I'm planning to glass in the windscreen in the next 48 hours or so.  The

top is glued in and I'm laying out the FG work.  Have tried to research

the task in the archives and in Kitplanes.  Basically planning to follow

the plans with the following ideas:

- Will cut strips on bias versus parallel to the weave so they drape easier

- Planning to use black dye in both the micro and the first layers of glass

- Will fan out the end of the strip to avoid a lump at the corners

- Taping off the edges with 2 layers of electrical tape per the plans

- Will try laying the dry cloth into resin painted on the surface versus

a wet lay-up - but will be prepared to go the other way if it feels better

-Planning to do one extended layup - cool shop, slow hardener.  If the

first sections start to set, it shouldn't be a problem

- Will finish with peel ply


This will be a 1 man job just because it feels OK.  My rivet

partner/spouse is available but don't see the need for the hands.  Ended

up Weld-on-ing the top edge one handed and that went well.


Any thoughts, advice, guidance or criticism welcome.


Thanks to Dave Saylor and others for the freely shared knowledge and

experience.


Bill "thinking that the last major fab job is the wheel pants followed

by many months of finish work" Watson
| | - The Matronics RV10-List Email Forum - | | | Use the List Feature Navigator to browse the many List utilities available such as the Email Subscriptions page, Archive Search & Download, 7-Day Browse, Chat, FAQ, Photoshare, and much more:
http://www.matronics.com/Navigator?RV10-List |
|
|
|
| Back to top |
|
 |
pitts_pilot(at)bellsouth.
Guest
|
| Posted: Sat Feb 20, 2010 9:55 am Post subject: Doing the windscreen - any last minutes tips? |
|
|
Bill Mauledriver Watson wrote:
| Quote: |
<MauleDriver(at)nc.rr.com>
I'm planning to glass in the windscreen in the next 48 hours or so. The
top is glued in and I'm laying out the FG work. Have tried to research
the task in the archives and in Kitplanes. Basically planning to follow
the plans with the following ideas:
- Will cut strips on bias versus parallel to the weave so they drape easier
Good move.
|
| Quote: | - Planning to use black dye in both the micro and the first layers of glass
Not necessary. I plan on painting the 'glareshield' black before
|
putting the windshield on. Contemplating painting a black stripe on the
inside of WS just to make the edge 'disappear'. Maybe I can get some
comments on that.
| Quote: | - Will fan out the end of the strip to avoid a lump at the corners
You can also shorten the layups to get rid of the bulge.
|
| Quote: | - Taping off the edges with 2 layers of electrical tape per the plans.
I haven't got that far, so I guess the tape is the boundary of the
|
layup? If so, wax the tape too.
| Quote: | - Will try laying the dry cloth into resin painted on the surface versus
a wet lay-up - but will be prepared to go the other way if it feels better
It will be better with a wet layup. Sandwich the cloth and the resin
|
betwen two layers of plastic film, and use a squeegee to move the resin
around in the cloth and squeegee the excess resin out of the cloth. Put
one layer on the airplane and scoop the excess resin to be used in the
next layer. I use the slow hardener too, to give the resin more working
time.
| Quote: | -Planning to do one extended layup - cool shop, slow hardener. If the
first sections start to set, it shouldn't be a problem
I agree .... I'd mark the center of the WS and the cloth to make it
|
easier to align ..... and I wouldn't do it by myself. At least one
other set of hands to help put the layups on the plane and even another
person to do resin mixing and wetting of the next layer.
| Quote: | - Will finish with peel ply
Excellent choice. Use short pieces precut like the layups since peel
|
ply doesn't like compound curves. OK to overlap the peel ply .... it'll
leave a small ridge and some fibers will get caught in the resin, but
better than sanding everything the whole thing a lot!
| Quote: |
This will be a 1 man job just because it feels OK. My rivet
partner/spouse is available but don't see the need for the hands. Ended
up Weld-on-ing the top edge one handed and that went well.
Trust me, you don't want to get started only to find that there's things
|
you haven't thought of and you don't have the time to take care of them.
I wouldn't do it by myself, and I have a fair amount of FG experience.
| Quote: |
Any thoughts, advice, guidance or criticism welcome.
MHO above .... YMMV. Let us know how it turns out .... we can always
|
learn from those that went before us.
| Quote: |
Thanks to Dave Saylor and others for the freely shared knowledge and
experience.
Bill "thinking that the last major fab job is the wheel pants followed
by many months of finish work" Watson
I think that's about accurate!!! Time spent now in prepping the
|
airplane prior to paint is worth 10X that later on.
Linn
| | - The Matronics RV10-List Email Forum - | | | Use the List Feature Navigator to browse the many List utilities available such as the Email Subscriptions page, Archive Search & Download, 7-Day Browse, Chat, FAQ, Photoshare, and much more:
http://www.matronics.com/Navigator?RV10-List |
|
|
|
| Back to top |
|
|
daveleikam(at)wi.rr.com
Guest
|
| Posted: Sat Feb 20, 2010 11:49 am Post subject: Doing the windscreen - any last minutes tips? |
|
|
I just did this almost exactly as your plan.  My shop was 60-65 F.  I did it

by myself with no problem.  I wet the first couple strips in a dish.  I then

laid the rest of the glass strips on the surface then worked the resin in.

Worked fine.  This is a pretty straight forward operation but a bit messy.


Dave Leikam

RV-10 #40496

N89DA

Muskego, WI


---
| | - The Matronics RV10-List Email Forum - | | | Use the List Feature Navigator to browse the many List utilities available such as the Email Subscriptions page, Archive Search & Download, 7-Day Browse, Chat, FAQ, Photoshare, and much more:
http://www.matronics.com/Navigator?RV10-List |
|
|
|
| Back to top |
|
|
coop85(at)verizon.net
Guest
|
| Posted: Sat Feb 20, 2010 12:13 pm Post subject: Doing the windscreen - any last minutes tips? |
|
|
Very similar to the process I used some time ago.  I agree with dying the

resin black, painting/covering the panel cover is good too, but tinting the

glass makes it look a lot nicer from inside the windshield.


Recommend you see how well the dry layup options works for you and be

prepared to go with all wet layups.  You don't want the layups in place to

be too wet or it will get messy and to get the new layer saturated with

resin without bubbles might take more work that you expect.  Give it a shot

though, as you might have more control of the cloth going on.  I also did

the whole thing in one sitting which makes it easier.


Peel ply is a great idea, I learned about that from my Q-2 long ago and it's

a real life saver.


Make sure you trim the edges along the electrical tape before it sets too

hard.  Cuts pretty easy while setting up but I'd hate to take a grinder to

the fiberglass that close to the windshield which is probably what it would

take after curing.


Good luck, this is probably one of the last real challenges before

completion (last challenge, not necessarily last in time spent to go

unfortunately).


Marcus

--
| | - The Matronics RV10-List Email Forum - | | | Use the List Feature Navigator to browse the many List utilities available such as the Email Subscriptions page, Archive Search & Download, 7-Day Browse, Chat, FAQ, Photoshare, and much more:
http://www.matronics.com/Navigator?RV10-List |
|
|
|
| Back to top |
|
|
indigoonlatigo(at)msn.com
Guest
|
| Posted: Sat Feb 20, 2010 4:39 pm Post subject: Doing the windscreen - any last minutes tips? |
|
|
Good luck, this is probably one of the last real challenges before

completion (last challenge, not necessarily last in time spent to go

unfortunately).


 Wishful thinking!


[quote] From: coop85(at)verizon.net

 To: rv10-list(at)matronics.com

 Subject: RE: Doing the windscreen - any last minutes tips?

 Date: Sat, 20 Feb 2010 15:12:27 -0500


 --> RV10-List message posted by: "Marcus Cooper" <coop85(at)verizon.net>


 Very similar to the process I used some time ago. I agree with dying the

 resin black, painting/covering the panel cover is good too, but tinting the

 glass makes it look a lot nicer from inside the windshield.


 Recommend you see how well the dry layup options works for you and be

 prepared to go with all wet layups. You don't want the layups in place to

 be too wet or it will get messy and to get the new layer saturated with

 resin without bubbles might take more work that you expect. Give it a shot

 though, as you might have more control of the cloth going on. I also did

 the whole thing in one sitting which makes it easier.


 Peel ply is a great idea, I learned about that from my Q-2 long ago and it's

 a real life saver.


 Make sure you trim the edges along the electrical tape before it sets too

 hard. Cuts pretty easy while setting up but I'd hate to take a grinder to

 the fiberglass that close to the windshield which is probably what it would

 take after curing.


 Good luck, this is probably one of the last real challenges before

 completion (last challenge, not necessarily last in time spent to go

 unfortunately).


 Marcus


 --
| | - The Matronics RV10-List Email Forum - | | | Use the List Feature Navigator to browse the many List utilities available such as the Email Subscriptions page, Archive Search & Download, 7-Day Browse, Chat, FAQ, Photoshare, and much more:
http://www.matronics.com/Navigator?RV10-List |
|
|
|
| Back to top |
|
|
Lew Gallagher
Joined: 04 Jan 2008
Posts: 402
Location: Greenville , SC
|
| Posted: Sat Feb 20, 2010 5:15 pm Post subject: Re: Doing the windscreen - any last minutes tips? |
|
|
Hey Bill "way overthinking but doing it right" Watson,


I just cut the strips, did the toner/black thing on the first layer, soaked them one at a time, and laid them up.  Really no big deal -- you did the weld-on, go for it!


I didn't brush the bubbles out, just wore disposable nitril gloves and hand smoothed the layers out, patted them in place, whatever.  You are going to have to sand, then skim with resin/microbeads using a bondo spatula a few times to get it perfect later anyway, so don't spend too much time obsessing over getting the layers themselves perfect.  Even the "humps" at the corners are easily ground off and skimmed.


One thought,  with the lower temps and slow hardener, you will probably get runs down the outside vertical edges (where others have suggested you taper off the layers so as to not get a hump).  So tape, mask, etc.  It is much easier to keep the resin off than to get it off later.  Also lay out drop cloths or newspaper on the floor for the same reason.  I scuffed the whole plane prior to priming, so it was only a bit more sanding to get those couple of drips off -- but the next one, I'll know better.


Let me know when you get to the wheel pants -- I really like the way ours turned out, splitting and glassing the lower fairing to the pants themselves.


Later, - Lew "started the engine for the first time Tues." Gallagher
| | - The Matronics RV10-List Email Forum - | | | Use the List Feature Navigator to browse the many List utilities available such as the Email Subscriptions page, Archive Search & Download, 7-Day Browse, Chat, FAQ, Photoshare, and much more:
http://www.matronics.com/Navigator?RV10-List |
|
_________________
non-pilot
crazy about building
NOW OFICIALLY BUILDER #40549
Fly off completed ! |
|
| Back to top |
|
|
pietflyr(at)bellsouth.net
Guest
|
| Posted: Sat Feb 20, 2010 6:01 pm Post subject: Doing the windscreen - any last minutes tips? |
|
|
Bill, if you need an extra set of hands, let me know.  I'd be happy to work

on something besides what I'm doing right now (pro-sealing the fuel tanks).


Jack Phillips

#40610  Wings (fuel tanks)

Raleigh, NC


--
| | - The Matronics RV10-List Email Forum - | | | Use the List Feature Navigator to browse the many List utilities available such as the Email Subscriptions page, Archive Search & Download, 7-Day Browse, Chat, FAQ, Photoshare, and much more:
http://www.matronics.com/Navigator?RV10-List |
|
|
|
| Back to top |
|
|
MauleDriver(at)nc.rr.com
Guest
|
| Posted: Sun Feb 21, 2010 1:52 pm Post subject: Doing the windscreen - any last minutes tips? |
|
|
Thanks Jack, with the Pro-seal left on your fingers I probably won't
need the black dye.
I'm still circling the shop enjoying the view (and the weather) and
haven't really commited to the lay up yet... if I had you come over I'd
probably get the job done so fast I wouldn't be able to enjoy the
procrastination.
But Thanks!
Bill
Jack Phillips wrote:
| Quote: |
Bill, if you need an extra set of hands, let me know. I'd be happy to work
on something besides what I'm doing right now (pro-sealing the fuel tanks).
Jack Phillips
#40610 Wings (fuel tanks)
Raleigh, NC
|
| | - The Matronics RV10-List Email Forum - | | | Use the List Feature Navigator to browse the many List utilities available such as the Email Subscriptions page, Archive Search & Download, 7-Day Browse, Chat, FAQ, Photoshare, and much more:
http://www.matronics.com/Navigator?RV10-List |
|
|
|
| Back to top |
|
|
Walt Fuller
Joined: 21 Jun 2009
Posts: 9
|
| Posted: Wed Feb 24, 2010 2:23 am Post subject: Re: Doing the windscreen - any last minutes tips? |
|
|
Get the wife to brush the strips as you're putting them on. Took us about an hour and a half to do the layups. We put em on wet and hand smoothed. We too kept the shop at around 60-65 degrees and did get some dripping along the vertical sides. A little extra sanding for that. For sanding the final filler I cut a wood block to a 7 inch radius which helped to maintain a nice smooth profile. Good luck with the project!


Walt Fuller

#40584

finishing up the baffling
| | - The Matronics RV10-List Email Forum - | | | Use the List Feature Navigator to browse the many List utilities available such as the Email Subscriptions page, Archive Search & Download, 7-Day Browse, Chat, FAQ, Photoshare, and much more:
http://www.matronics.com/Navigator?RV10-List |
|
|
|
| Back to top |
|
|
MauleDriver(at)nc.rr.com
Guest
|
| Posted: Thu Feb 25, 2010 12:24 pm Post subject: Doing the windscreen - any last minutes tips? |
|
|
An update - the windscreen is glassed in and mostly filled - still
sanding. A few random reflections:
- masking off the surrounding area is a very good idea - it's not a
particularly messy job but still glad I did
- I decided to start with a wet layup. However I did some
experimentation that I regretted. I've been using 'Saran wrap' to make
up the wet layups. This time I tried 4 or 6 mill plastic (thick and
stiff) since I noticed some people doing that and I thought it might
work better with the long pieces. Should have stayed with the kitchen
wrap. The plastic didn't want to follow the compound curve and tended
to pull at the cloth. I switched over to dry layup and that really
worked well. But bottom line, any technique can work but working single
handed made the decision more critical.
- The bias cut seems to work well. I parallel cut the first 2 layers
then bias cut the remainder. This is counter to the plans but seems to
be the right way to go.
- Time is not really a factor. I mixed 3 or 4 batches of epoxy as I
worked my way thru the job - no problem if 1 and 2 start to setup.
- Black dye seems to work well - a little bottle from ACS is a lifetime
supply.
- I didn't pay too much attention to the potential lump at the ends. I
spread the layers a bit and cut them short a bit but there is a little
hump which will fill and sand away. But spreading the layers near the
end is the craftsman like way to this.
- When I applied the peel ply, it became obvious why thicker plastic
wouldn't wrap around the windscreen when I was trying the we layup.
Stiff plastic and peel ply don't go around compound curves easily.
Saran wrap and wet cloth? Much easier to handle
- After 3 layers of micro, the filet radius looks great. We'll just
keep sanding.
Bottom line is that Van's procedure works fine as-is (no surprise
there). It can be done a bit better and easier by applying some common
sense and list tips.
Thanks all!
Bill "starting the wheel pants and trying to figure out how to jack this
monster off the floor" Watson
Bill Mauledriver Watson wrote:
| Quote: | I'm planning to glass in the windscreen in the next 48 hours or so.
The top is glued in and I'm laying out the FG work. Have tried to
research the task in the archives and in Kitplanes. Basically
planning to follow the plans with the following ideas:
- Will cut strips on bias versus parallel to the weave so they drape
easier
- Planning to use black dye in both the micro and the first layers of
glass
- Will fan out the end of the strip to avoid a lump at the corners
- Taping off the edges with 2 layers of electrical tape per the plans
- Will try laying the dry cloth into resin painted on the surface
versus a wet lay-up - but will be prepared to go the other way if it
feels better
-Planning to do one extended layup - cool shop, slow hardener. If the
first sections start to set, it shouldn't be a problem
- Will finish with peel ply
This will be a 1 man job just because it feels OK. My rivet
partner/spouse is available but don't see the need for the hands.
Ended up Weld-on-ing the top edge one handed and that went well.
Any thoughts, advice, guidance or criticism welcome.
Thanks to Dave Saylor and others for the freely shared knowledge and
experience.
Bill "thinking that the last major fab job is the wheel pants followed
by many months of finish work" Watson
|
| | - The Matronics RV10-List Email Forum - | | | Use the List Feature Navigator to browse the many List utilities available such as the Email Subscriptions page, Archive Search & Download, 7-Day Browse, Chat, FAQ, Photoshare, and much more:
http://www.matronics.com/Navigator?RV10-List |
|
|
|
| Back to top |
|
|
pitts_pilot(at)bellsouth.
Guest
|
| Posted: Thu Feb 25, 2010 4:04 pm Post subject: Doing the windscreen - any last minutes tips? |
|
|
Thanks for the play-by-play! I'm sure you're glad that's past!!!
FWIW, I find the saran wrap too flimsy and it tears easily. 2 mil
plastic is about right. 6 mil just doesn't want to 'sag' easily. On
long runs, pull off the top layer of the plastic sandwich then roll the
plastic/wet glass up. Unroll and pull the plastic off starting on one
end .... because the other end is in the center of the roll. Duh! Once
you get the FG started, you can just unroll and separate the FG, laying
it where you want it.
You're spot on about the peel ply. With compound curves, use short
pieces and overlap the oieces. You'll be left with small ridges which
easily sand out. ..... better than having no peel ply.
Linn
Bill Mauledriver Watson wrote:
| Quote: |
<MauleDriver(at)nc.rr.com>
An update - the windscreen is glassed in and mostly filled - still
sanding. A few random reflections:
- masking off the surrounding area is a very good idea - it's not a
particularly messy job but still glad I did
- I decided to start with a wet layup. However I did some
experimentation that I regretted. I've been using 'Saran wrap' to make
up the wet layups. This time I tried 4 or 6 mill plastic (thick and
stiff) since I noticed some people doing that and I thought it might
work better with the long pieces. Should have stayed with the kitchen
wrap. The plastic didn't want to follow the compound curve and tended
to pull at the cloth. I switched over to dry layup and that really
worked well. But bottom line, any technique can work but working single
handed made the decision more critical.
- The bias cut seems to work well. I parallel cut the first 2 layers
then bias cut the remainder. This is counter to the plans but seems to
be the right way to go.
- Time is not really a factor. I mixed 3 or 4 batches of epoxy as I
worked my way thru the job - no problem if 1 and 2 start to setup. -
Black dye seems to work well - a little bottle from ACS is a lifetime
supply.
- I didn't pay too much attention to the potential lump at the ends. I
spread the layers a bit and cut them short a bit but there is a little
hump which will fill and sand away. But spreading the layers near the
end is the craftsman like way to this.
- When I applied the peel ply, it became obvious why thicker plastic
wouldn't wrap around the windscreen when I was trying the we layup.
Stiff plastic and peel ply don't go around compound curves easily.
Saran wrap and wet cloth? Much easier to handle
- After 3 layers of micro, the filet radius looks great. We'll just
keep sanding.
Bottom line is that Van's procedure works fine as-is (no surprise
there). It can be done a bit better and easier by applying some common
sense and list tips.
Thanks all!
Bill "starting the wheel pants and trying to figure out how to jack this
monster off the floor" Watson
Bill Mauledriver Watson wrote:
> I'm planning to glass in the windscreen in the next 48 hours or so.
> The top is glued in and I'm laying out the FG work. Have tried to
> research the task in the archives and in Kitplanes. Basically
> planning to follow the plans with the following ideas:
> - Will cut strips on bias versus parallel to the weave so they drape
> easier
> - Planning to use black dye in both the micro and the first layers of
> glass
> - Will fan out the end of the strip to avoid a lump at the corners
> - Taping off the edges with 2 layers of electrical tape per the plans
> - Will try laying the dry cloth into resin painted on the surface
> versus a wet lay-up - but will be prepared to go the other way if it
> feels better
> -Planning to do one extended layup - cool shop, slow hardener. If the
> first sections start to set, it shouldn't be a problem
> - Will finish with peel ply
>
> This will be a 1 man job just because it feels OK. My rivet
> partner/spouse is available but don't see the need for the hands.
> Ended up Weld-on-ing the top edge one handed and that went well.
>
> Any thoughts, advice, guidance or criticism welcome.
>
> Thanks to Dave Saylor and others for the freely shared knowledge and
> experience.
>
> Bill "thinking that the last major fab job is the wheel pants followed
> by many months of finish work" Watson
>
|
| | - The Matronics RV10-List Email Forum - | | | Use the List Feature Navigator to browse the many List utilities available such as the Email Subscriptions page, Archive Search & Download, 7-Day Browse, Chat, FAQ, Photoshare, and much more:
http://www.matronics.com/Navigator?RV10-List |
|
|
|
| Back to top |
|
|
MauleDriver(at)nc.rr.com
Guest
|
| Posted: Thu Feb 25, 2010 6:35 pm Post subject: Doing the windscreen - any last minutes tips? |
|
|
Yep, 2 mil sounds right. I tried the rollup approach with the 6 mil dry
and wet. The dry worked well enough and I used it for most of my dry
layups. The wet probably would have worked great with 2mil but not with
the 6.
Bill
Linn Walters wrote:
| Quote: |
Thanks for the play-by-play! I'm sure you're glad that's past!!!
FWIW, I find the saran wrap too flimsy and it tears easily. 2 mil
plastic is about right. 6 mil just doesn't want to 'sag' easily. On
long runs, pull off the top layer of the plastic sandwich then roll
the plastic/wet glass up. Unroll and pull the plastic off starting on
one end .... because the other end is in the center of the roll.
Duh! Once you get the FG started, you can just unroll and separate
the FG, laying it where you want it.
You're spot on about the peel ply. With compound curves, use short
pieces and overlap the oieces. You'll be left with small ridges which
easily sand out. ..... better than having no peel ply.
Linn
Bill Mauledriver Watson wrote:
>
> <MauleDriver(at)nc.rr.com>
>
> An update - the windscreen is glassed in and mostly filled - still
> sanding. A few random reflections:
> - masking off the surrounding area is a very good idea - it's not a
> particularly messy job but still glad I did
> - I decided to start with a wet layup. However I did some
> experimentation that I regretted. I've been using 'Saran wrap' to
> make up the wet layups. This time I tried 4 or 6 mill plastic (thick
> and stiff) since I noticed some people doing that and I thought it
> might work better with the long pieces. Should have stayed with the
> kitchen wrap. The plastic didn't want to follow the compound curve
> and tended to pull at the cloth. I switched over to dry layup and
> that really worked well. But bottom line, any technique can work but
> working single handed made the decision more critical.
> - The bias cut seems to work well. I parallel cut the first 2 layers
> then bias cut the remainder. This is counter to the plans but seems
> to be the right way to go.
> - Time is not really a factor. I mixed 3 or 4 batches of epoxy as I
> worked my way thru the job - no problem if 1 and 2 start to setup. -
> Black dye seems to work well - a little bottle from ACS is a
> lifetime supply.
> - I didn't pay too much attention to the potential lump at the ends.
> I spread the layers a bit and cut them short a bit but there is a
> little hump which will fill and sand away. But spreading the layers
> near the end is the craftsman like way to this.
> - When I applied the peel ply, it became obvious why thicker plastic
> wouldn't wrap around the windscreen when I was trying the we layup.
> Stiff plastic and peel ply don't go around compound curves easily.
> Saran wrap and wet cloth? Much easier to handle
> - After 3 layers of micro, the filet radius looks great. We'll just
> keep sanding.
>
> Bottom line is that Van's procedure works fine as-is (no surprise
> there). It can be done a bit better and easier by applying some
> common sense and list tips.
>
> Thanks all!
>
> Bill "starting the wheel pants and trying to figure out how to jack
> this monster off the floor" Watson
>
> Bill Mauledriver Watson wrote:
>> I'm planning to glass in the windscreen in the next 48 hours or so.
>> The top is glued in and I'm laying out the FG work. Have tried to
>> research the task in the archives and in Kitplanes. Basically
>> planning to follow the plans with the following ideas:
>> - Will cut strips on bias versus parallel to the weave so they drape
>> easier
>> - Planning to use black dye in both the micro and the first layers
>> of glass
>> - Will fan out the end of the strip to avoid a lump at the corners
>> - Taping off the edges with 2 layers of electrical tape per the plans
>> - Will try laying the dry cloth into resin painted on the surface
>> versus a wet lay-up - but will be prepared to go the other way if it
>> feels better
>> -Planning to do one extended layup - cool shop, slow hardener. If
>> the first sections start to set, it shouldn't be a problem
>> - Will finish with peel ply
>>
>> This will be a 1 man job just because it feels OK. My rivet
>> partner/spouse is available but don't see the need for the hands.
>> Ended up Weld-on-ing the top edge one handed and that went well.
>>
>> Any thoughts, advice, guidance or criticism welcome.
>>
>> Thanks to Dave Saylor and others for the freely shared knowledge and
>> experience.
>>
>> Bill "thinking that the last major fab job is the wheel pants
>> followed by many months of finish work" Watson
>>
>
|
| | - The Matronics RV10-List Email Forum - | | | Use the List Feature Navigator to browse the many List utilities available such as the Email Subscriptions page, Archive Search & Download, 7-Day Browse, Chat, FAQ, Photoshare, and much more:
http://www.matronics.com/Navigator?RV10-List |
|
|
|
| Back to top |
|
|
indigoonlatigo(at)msn.com
Guest
|
| Posted: Thu Feb 25, 2010 6:49 pm Post subject: Doing the windscreen - any last minutes tips? |
|
|
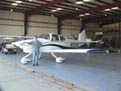
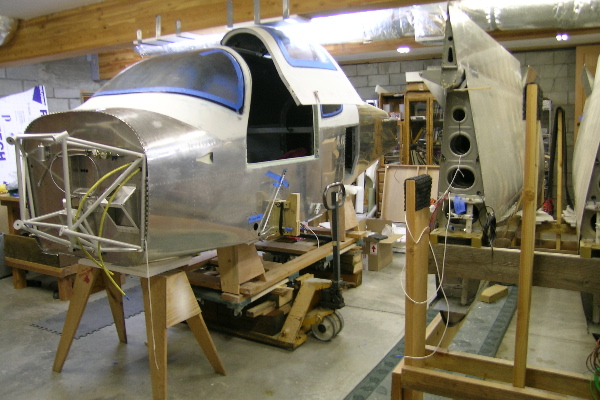
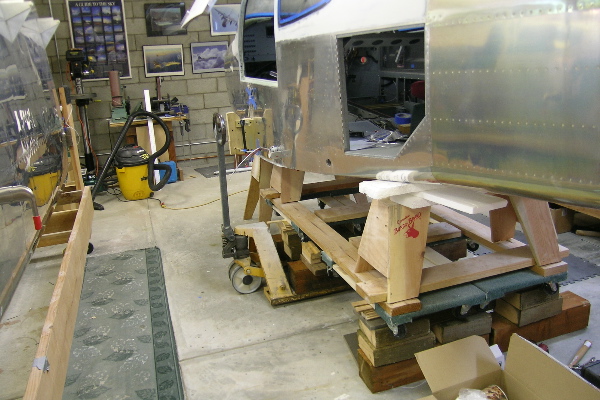
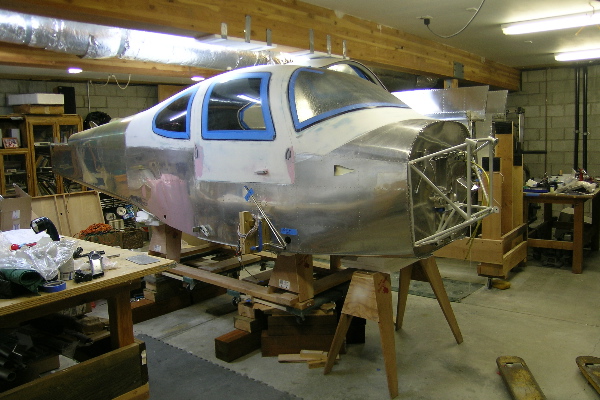
Use a floor palate jack, lots of wooden blocks and wooden wedges to fine tune the for leveling. Might only take a few hours...to find, then cut all that wood around the house, and go up and down with the jack trying in different wood pieces until perfect.


Put padded saw horses under it too in the event of an earthquake. That should work unless the entire house falls on it. Ain't building in the basement great.


[quote] Date: Thu, 25 Feb 2010 15:22:31 -0500

 From: MauleDriver(at)nc.rr.com

 To: rv10-list(at)matronics.com

 Subject: Re: Doing the windscreen - any last minutes tips?
| | - The Matronics RV10-List Email Forum - | | | Use the List Feature Navigator to browse the many List utilities available such as the Email Subscriptions page, Archive Search & Download, 7-Day Browse, Chat, FAQ, Photoshare, and much more:
http://www.matronics.com/Navigator?RV10-List |
|
| Description: |
|
| Filesize: |
146.5 KB |
| Viewed: |
11993 Time(s) |
|
| Description: |
|
| Filesize: |
148.65 KB |
| Viewed: |
11993 Time(s) |
|
| Description: |
|
| Filesize: |
149.58 KB |
| Viewed: |
11993 Time(s) |
|
|
|
| Back to top |
|
|
Jim Berry
Joined: 10 Jan 2006
Posts: 237
Location: Denver
|
| Posted: Thu Feb 25, 2010 7:57 pm Post subject: Re: Doing the windscreen - any last minutes tips? |
|
|
Bill,


A less wood-intensive method of supporting the fuselage in the correct position is to C-clamp a 2x4 vertically to each spar stub. Use a bottle jack and short piece of 2x4 under the spar stub to raise each side to the proper height. Reclamp the first 2x4 so it extends to the floor. I replaced the rear tie down ring with a bolt, then used a tripod stand to hold the tail at the correct height to level the longerons fore and aft. Since I had already hung my engine, I also used my engine lift with a nylon strap around the upper motor mount tubes to support most of the weight of the fuselage. A laser level that shoots an overhead line is an easy way to establish an accurate centerline the full length of the fuselage, then measure an offset line L and R for each wheel pant.


Jim Berry

40483

N15JB
| | - The Matronics RV10-List Email Forum - | | | Use the List Feature Navigator to browse the many List utilities available such as the Email Subscriptions page, Archive Search & Download, 7-Day Browse, Chat, FAQ, Photoshare, and much more:
http://www.matronics.com/Navigator?RV10-List |
|
|
|
| Back to top |
|
|
MauleDriver(at)nc.rr.com
Guest
|
| Posted: Thu Feb 25, 2010 9:05 pm Post subject: Doing the windscreen - any last minutes tips? |
|
|
Jim, it finally dawned on me that jacking the spar stubs was going to be
the key. I have the engine installed and it's sitting on the gear.
But I'm having a hard time visualizing exactly what you are suggesting
for the c-clamped 2x4. Can you elaborate a bit?
Thanks
Bill Watson
40605
Jim Berry wrote:
| Quote: |
Bill,
A less wood-intensive method of supporting the fuselage in the correct position is to C-clamp a 2x4 vertically to each spar stub. Use a bottle jack and short piece of 2x4 under the spar stub to raise each side to the proper height. Reclamp the first 2x4 so it extends to the floor. I replaced the rear tie down ring with a bolt, then used a tripod stand to hold the tail at the correct height to level the longerons fore and aft. Since I had already hung my engine, I also used my engine lift with a nylon strap around the upper motor mount tubes to support most of the weight of the fuselage. A laser level that shoots an overhead line is an easy way to establish an accurate centerline the full length of the fuselage, then measure an offset line L and R for each wheel pant.
Jim Berry
40483
N15JB
|
| | - The Matronics RV10-List Email Forum - | | | Use the List Feature Navigator to browse the many List utilities available such as the Email Subscriptions page, Archive Search & Download, 7-Day Browse, Chat, FAQ, Photoshare, and much more:
http://www.matronics.com/Navigator?RV10-List |
|
|
|
| Back to top |
|
|
Jim Berry
Joined: 10 Jan 2006
Posts: 237
Location: Denver
|
| Posted: Fri Feb 26, 2010 10:19 am Post subject: Re: Doing the windscreen - any last minutes tips? |
|
|
Bill,


The bottle jack and short 2x4 go under the spar stubs, and are used to tweak the fuselage level side-to-side. The longer 2x4s are clamped to the aft sides of the spar stubs to help maintain the level position. It needs to be long enough to reach from the top of the spar to the floor. I used 2 C clamps per side. I jacked the spars just enough to get the main tires about 1/4" off the ground, then raised the low side a little more to bring the fuselage level. The C clamped 2x4s did a good job of maintaining that position, and showed no tendency to walk. Once you have it leveled side-to-side it is easy to tweak the engine hoist and/or tail support to get level fore and aft.


The other thing that really helped in getting the wheel pants in position was to make 2 L-shaped jigs to hold the wheel pant level fore and aft. Basically just 2 plywood supports with one leg on the floor and the other leg perpendicular to the floor. After you establish the fore and aft level line on each wheel pant(use a laser level) you can measure the height from that line to the ground. Drill a #40 hole in the nose and tail of each pant on the level line. Drill a hole in each jig the same distance from the floor, and pin each jig to the pant with a finishing nail. You now have a way to hold the pant level and at the correct height. By moving the jigs around you have a stable way to position the pant relative to the tire and mounting bracket. Have fun.


Jim Berry

40482

N15JB
| | - The Matronics RV10-List Email Forum - | | | Use the List Feature Navigator to browse the many List utilities available such as the Email Subscriptions page, Archive Search & Download, 7-Day Browse, Chat, FAQ, Photoshare, and much more:
http://www.matronics.com/Navigator?RV10-List |
|
|
|
| Back to top |
|
|
MauleDriver(at)nc.rr.com
Guest
|
| Posted: Wed Mar 03, 2010 7:04 am Post subject: Doing the windscreen - any last minutes tips? |
|
|
Jim, just wanted to say Thanks for the detail on the jacking. I never
would have tried the C-clamp thing on my own but it works great. Engine
hoist on the engine mount (engine on), an oak 1.5x1.5 c-clamped to each
spar, a camera tripod doing nothing back at the tail.
The first pant is going on fine - might try the 2 ply supports but not
having any problems there yet. I just got a laser line thingy - very
cool. $30 at Sears for a 1 line device with detachable magnetic mount.
Couldn't imagine exactly how to use it despite all the mentions of it's
use on this list. Fool around with it for 10 minutes and it starts to
seem indispensible. The centerline of the aircraft thing is a piece of
cake.
Bill "starting to enjoy an otherwise uncomfortable set of tasks" Watson
40605 Durham NC
Jim Berry wrote:
| Quote: |
Bill,
The bottle jack and short 2x4 go under the spar stubs, and are used to tweak the fuselage level side-to-side. The longer 2x4s are clamped to the aft sides of the spar stubs to help maintain the level position. It needs to be long enough to reach from the top of the spar to the floor. I used 2 C clamps per side. I jacked the spars just enough to get the main tires about 1/4" off the ground, then raised the low side a little more to bring the fuselage level. The C clamped 2x4s did a good job of maintaining that position, and showed no tendency to walk. Once you have it leveled side-to-side it is easy to tweak the engine hoist and/or tail support to get level fore and aft.
The other thing that really helped in getting the wheel pants in position was to make 2 L-shaped jigs to hold the wheel pant level fore and aft. Basically just 2 plywood supports with one leg on the floor and the other leg perpendicular to the floor. After you establish the fore and aft level line on each wheel pant(use a laser level) you can measure the height from that line to the ground. Drill a #40 hole in the nose and tail of each pant on the level line. Drill a hole in each jig the same distance from the floor, and pin each jig to the pant with a finishing nail. You now have a way to hold the pant level and at the correct height. By moving the jigs around you have a stable way to position the pant relative to the tire and mounting bracket. Have fun.
Jim Berry
40482
N15JB
|
| | - The Matronics RV10-List Email Forum - | | | Use the List Feature Navigator to browse the many List utilities available such as the Email Subscriptions page, Archive Search & Download, 7-Day Browse, Chat, FAQ, Photoshare, and much more:
http://www.matronics.com/Navigator?RV10-List |
|
|
|
| Back to top |
|
|
Jim Berry
Joined: 10 Jan 2006
Posts: 237
Location: Denver
|
| Posted: Wed Mar 03, 2010 8:35 am Post subject: Re: Doing the windscreen - any last minutes tips? |
|
|
Bill,


I am glad to hear it is working for you. Your first laser level is just the foot in the door. I started with a single line level, then a dual line, and now a 5 line level. They are kind of like hammers; more is better.


Jim Berry

40482
| | - The Matronics RV10-List Email Forum - | | | Use the List Feature Navigator to browse the many List utilities available such as the Email Subscriptions page, Archive Search & Download, 7-Day Browse, Chat, FAQ, Photoshare, and much more:
http://www.matronics.com/Navigator?RV10-List |
|
|
|
| Back to top |
|
|
|
|
You cannot post new topics in this forum
You cannot reply to topics in this forum
You cannot edit your posts in this forum
You cannot delete your posts in this forum
You cannot vote in polls in this forum
You cannot attach files in this forum
You can download files in this forum
|
Powered by phpBB © 2001, 2005 phpBB Group
|

